
Building With Mud Bricks
Other Publications
A Middle Class Man: An Autobiography
Alistair Knox (1912-1986): modernism, environment and the spirit of place
Alistair Knox and the birth of environmental building in Australia
The Home Builder's Manual of Mud Brick Design and Construction
Housing grouped in rural setting
alistair knox : an integrated approach to landscape + architecture
House that Captures the Country's Soul
Hexagonal Design for Eltham House
Eltham the Mecca of Landscape Painters
With the Clay of Life, House and Land Are One
House Built with Head, Heart and Hand
Author: Alistair Knox
Article from the magazine 'Concrete, Mud, Stone and how to use them' Published circa 1948. Cover price 2/6
No book on concrete construction for the home builder would be complete without a chapter on building in mud. It is curious that mud - the oldest known building material should combine so explicitly with reinforced concrete, the universal structural medium of today. The reason is that both are initially plastic on the actual building site and therefore flexible in application, and capable of forming together with an ideal bond.
From the home builder's point of view there is the additional advantage that it may be undertaken without extensive experience as would be required in timber or traditional brick construction. By following simple rules and acquiring experience as he process, the amateur becomes proficient in his work and confident in his ability.
Mud is an excellent material for building walls. It is obtainable cheap, and substantial. Its insulating and enduring qualities are remarkable. But it lacks tensile strength that is the walls will not stand great outward or inward thrust. Reinforced concrete can be designed into the building along the top of the wall in such a way that, not only does it span window openings but also combines with the mud to form a homogeneous whole, of good appearance and great structural strength.
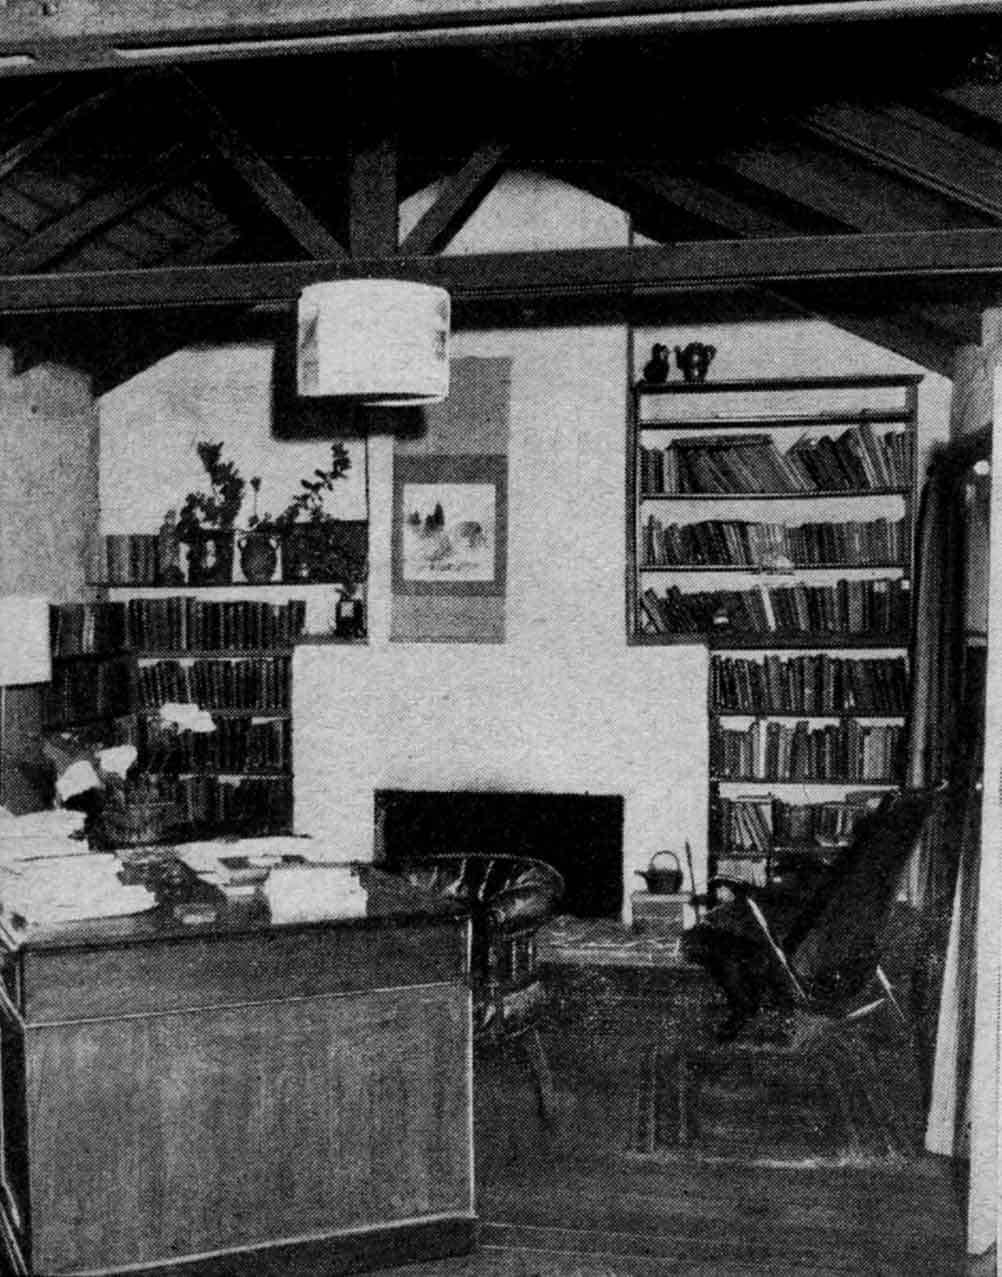 Interior of Professor Macmahon Ball's studio at Eltham
The first question most amateur builders interested in mud construction ask is, "How much would it cost me to build a mud brick room about 30ft by 20ft. if I did all the work myself?" It is hard to give a definite answer until you know what they mean by a room. If they expect to squeeze in a small hot water service and a septic tank closet, kitchen equipment and built-in furniture, the price of any type of wall construction would become a secondary consideration. But, if the room envisages a simple, pleasing area with a fireplace, adequate windows and a homely atmosphere, the cost would be less than half that of a comparable timber construction. It should be emphasised, however, that doing the work oneself does entail a lot of physical effort. The finished result should be better than a timber building, both for living in and for durability.
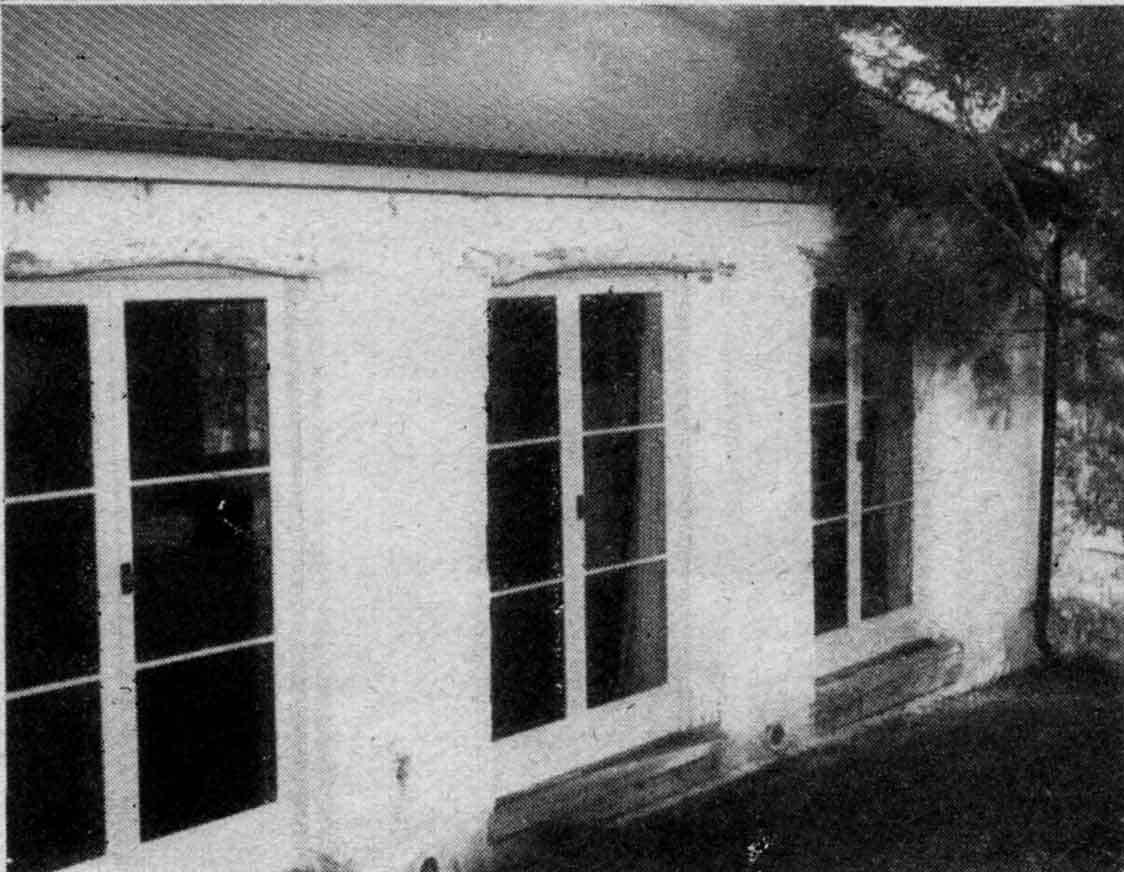
The building photographed and described in this article was designed and built by the present writer for Professor Macmahon Ball to serve as a study on his property at Eltham, Victoria. The ground floor dimensions are 25ft. by 15ft. Commercially, allowing ten per cent for profit, it was built in 1948 for £440. The price in 1950 would be somewhat higher, owing to increases in the basic wage. If the owner were to build it himself it would not cost much over £100 for the materials. The photograph of the interior shows how Mrs. Ball's deftness in furnishing has produced a completely satisfying and restful result without great expenditure. The secret of living with Mud is to understand that the natural quality of the material gives a sense of homeliness unobtainable otherwise. The plan of the second building was produced for Mr. Lionel Buckney at Lower Plenty. It is a development of the one-roomed idea into a flexible three-roomed plan, ebodying the experience gained from building Professor Macmahon Ball's study.
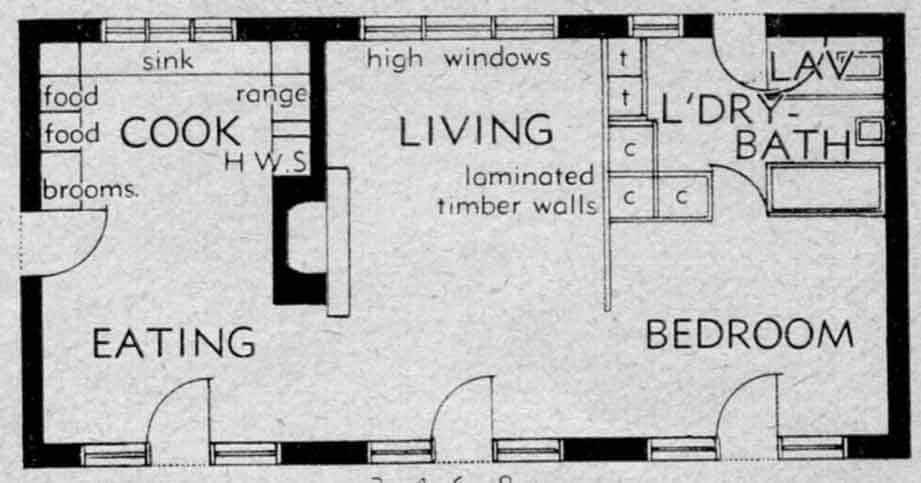 Fig. 1 Plan of Buckney's house
Both are unbroken rectangular plans, the first because its form was dictated by the existing buildings it was adjacent to, the second because it provided a resolved answer to the client's requirements that it was not above his ability to construct himself. Neither have complicated building problems, yet in both cases the pitch of the roof is repeated in the interior with a resultant outward thrust on the exterior walls which had to be provided for. Architecturally the time and consideration given to repeating the pitch of the roof internally are well repaid. Correctly handled the answer need be no more expensive than otherwise, while the spatial and visual results are greatly improved.
To the uninitiated the miracle of mud turning into stone has to be seen to be believed. But in a sense this is what happens: A comprehensive survey of the strength and properties bf varying earth mixes is contained in duplicated Document No. 28 produced by the Commonwealth Experimental Building station, Ryde, New South Wales. It may be obtained by writing to them. The cost is one shilling. In essence, any combination of earth between about one-third to two-thirds granular and sand-like material and one-third to two-thirds clay or colloidal material combines. when thoroughly puddled and mixed with water and dried to become solid blocks, capable of withstanding a crushing strength of about 200 pounds to the square inch. As the external walls are normally 12in. thick each foot run of wall would support at its base about thirteen tons. In normal work the margin of safety would be well over 10 to 1. They are remarkably water-resistant even in their raw state, and on account of the thickness and nature of the material, excellent sound and heat insulators.
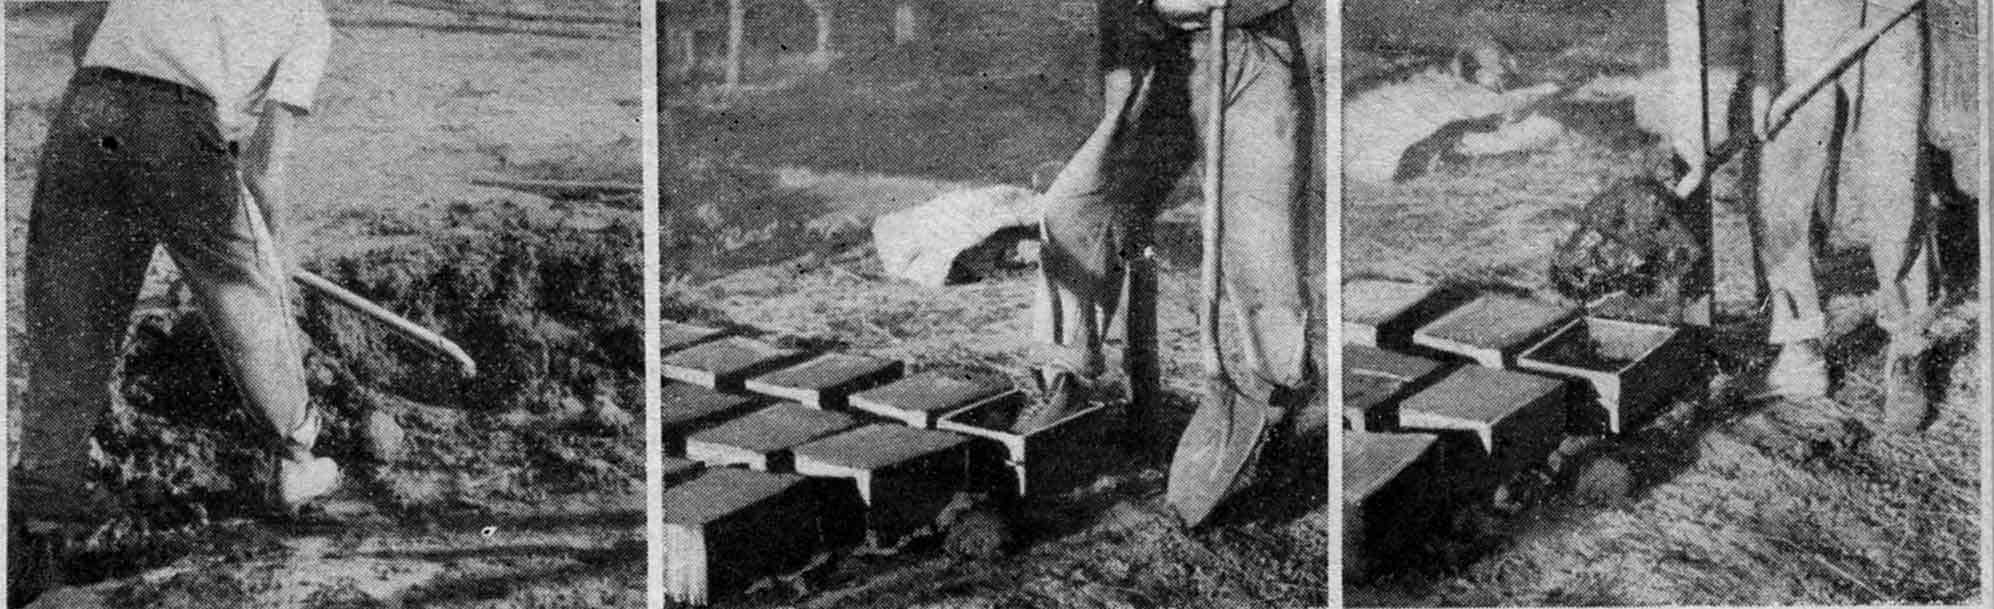
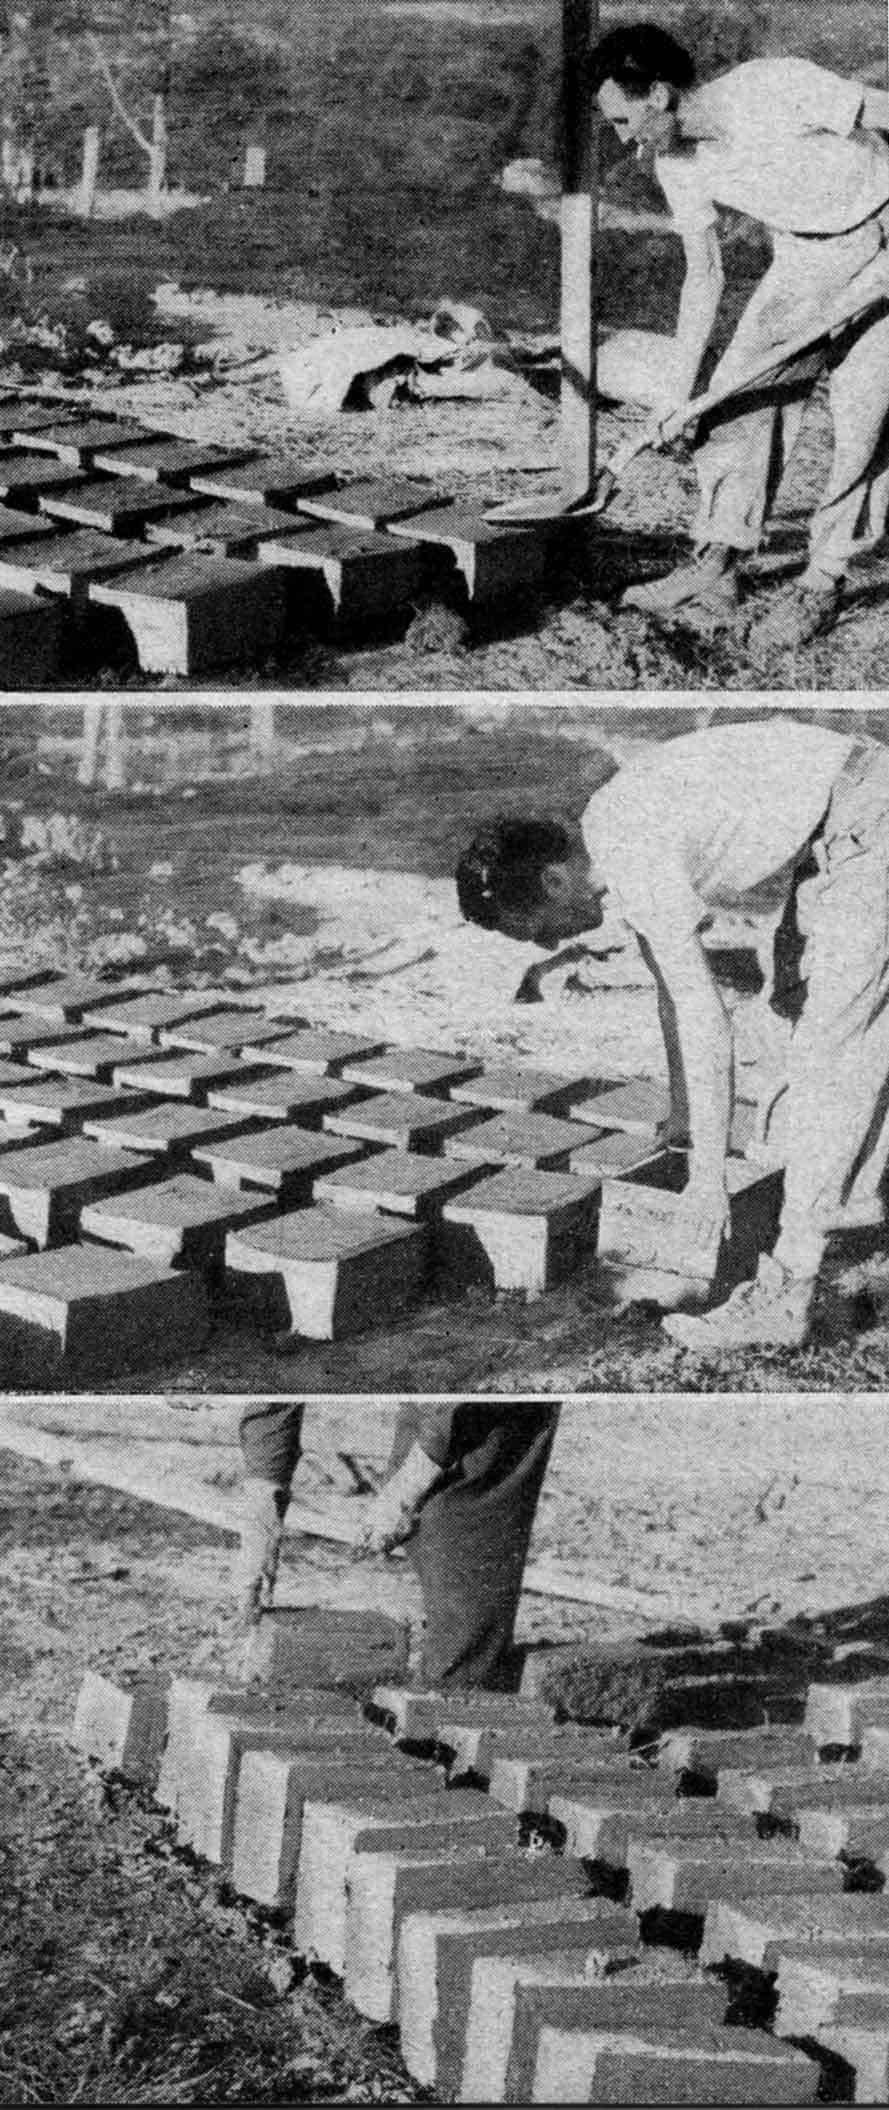
Making Mud Bricks
The simplest method of making them into building blocks or bricks is to use a steel mould constructed from about ½ inch steel plate. In Victorian conditions over a long testing period the best dimension has been found to be 12in x 9in x 6in and 15in x 9in x 6in. It was also discovered that the greater the clay content of the bricks up to about two-thirds clay, the greater the strength. Straw at the rate of about a handful of stalks (chopped into shortish lengths) to a barrowload of earth, was added when the bricks were clayey, whereas in topsoil or sandy loam bricks, no added binding was necessary. The straw prevented the bricks from tending to crack whilst drying and seemed to add some tensjle strength to them: Some brick makers maintain that there is a minor -chemical action between the straw and the earth, resulting in greater, hardening.
Speed and efficiency in the making of the bricks depends largely on organisation. There must be plenty of water available. The earth must be thoroughly wetted down and mixed. A rotary hoe is excellent for this process especially when there is straw with the soil. The larger the mix that can be made and used at a time - within reasonable bounds - the better. As the mould is only, four sided the flatter the base on which the bricks are set, the squarer the brick. If the base slab method of building is used (explained on this page) there could be no better place to make the bricks.
Each brick is made by half filling the mould With the mix, tamping down lightly so that all the interstices are eliminated, completely filling then firmly pressing and smoothing down the material, cutting around the edges with an old bread knife or a mason's trowel and carefully slipping off the mould. A shiny straw flecked block of yellowish earth results, which in good windy conditions will be dry enough to turn on its edge without slumping in a day. They should be allowed to cure until they are hard throughout. This time varies according to conditions from as little as two days to as much as two weeks. The average being about seven days, so that the week-end builder should be able to fill his slab one week-end and gather his harvest the next, repeating the process until he has the requisite number for his purpose.
Good Sites and Solid Foundations
The site on which a mud brick house is to be built should always be considered carefully. Earth will be required for the bricks and it is generally advisable to get it from the immediate area if possible. If there is an appreciable slope as occurred in both the houses described in this article, bringing the land to an even level on which to build, not only makes the job less expensive, but also improves the appearance and workability of the design.
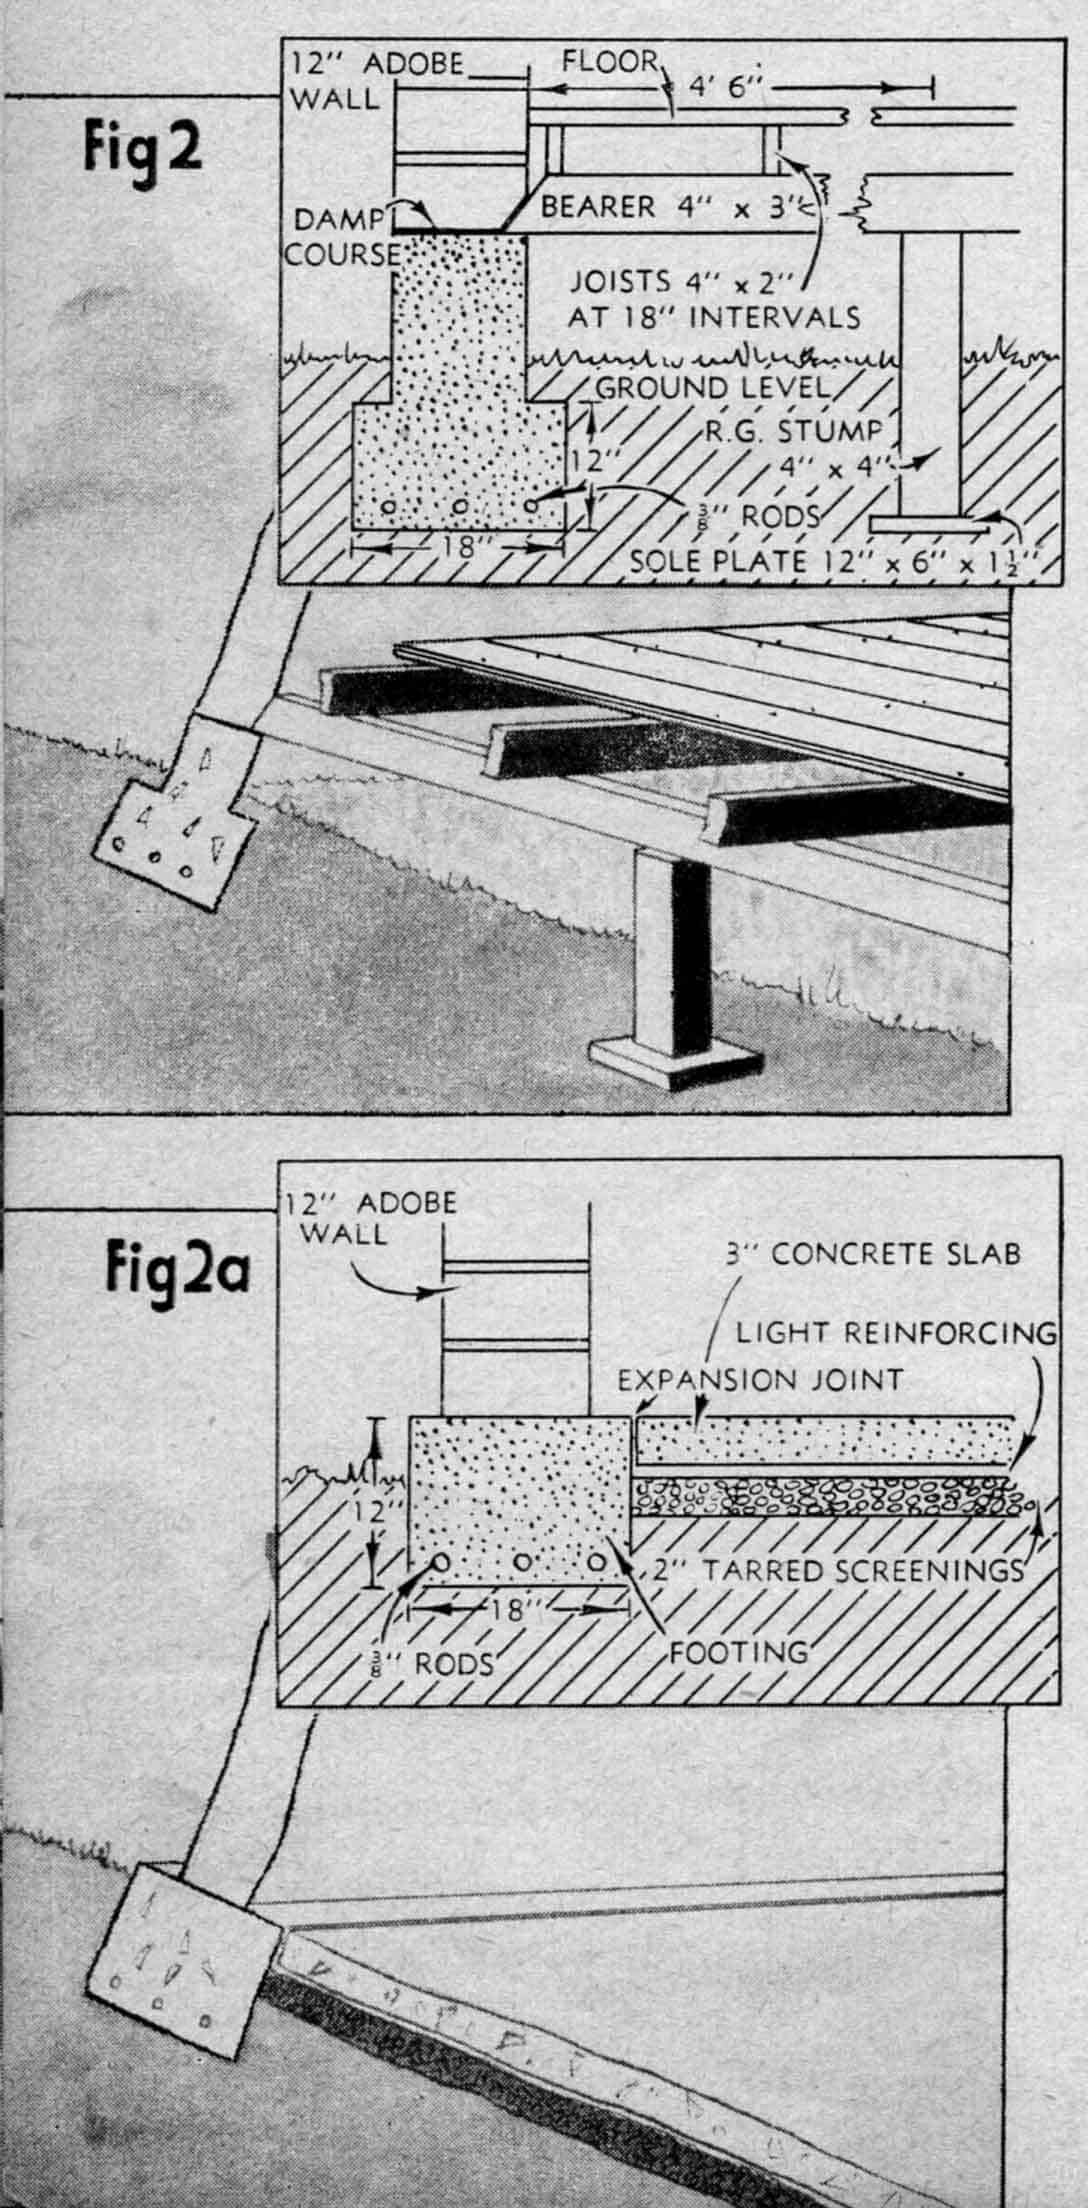
All mud houses should have foundations of concrete or other impervious and structural material rising at least three to four inches from the surrounding ground level so that the lowest course of brickwork, is clear of any directed flow of surface or storm water. There are two ways of doing this, the first was employed in the studio as shown in diagram No. 1. The inverted T shape gives adeqµate bearing surface to spread the weight they bear and the narrower vertical section keeps the walls from contact With the ground. Within this perimeter the usual bearer and joist construction was employed (see Diagram 1).
It was found by experience that it was preferable to use the method shown in Diagram 2 for two reasons, (a) that it is good design in the temperate Australian climate to keep the building close to the surrounding levels so that contact with the exterior is as simple and flexible as possible; (b) it allowed for a greater variety of floor finishes most of which require a concrete base. The cost of laying a three inch slab or concrete between the foundations which have been raised the necessary height from the ground is little, if any, more than the expenditure involved in the method of diagram 1 when two extra courses of brickwork needed to lift the walls to allow for air space underneath the floors are taken into consideration. The home builder may argue that he can produce the bricks for no other outlay than his time, but he should remember that he may find it as limited as his money. The second house employs the slab method. In either case it is essential to use a damp course between the concrete and the earth. There are numbers of such products on the market which are reliable, in this case a malthoid membrane was used.
Making the Floor
When constructing the floor slab for the building first box up the wall foundations (footings) with timber so that they are 18in wide and not less than 6in into the excavated ground level (unless it is solid stone). If the side is flat the foundations must go down to a consistent subsoil base.
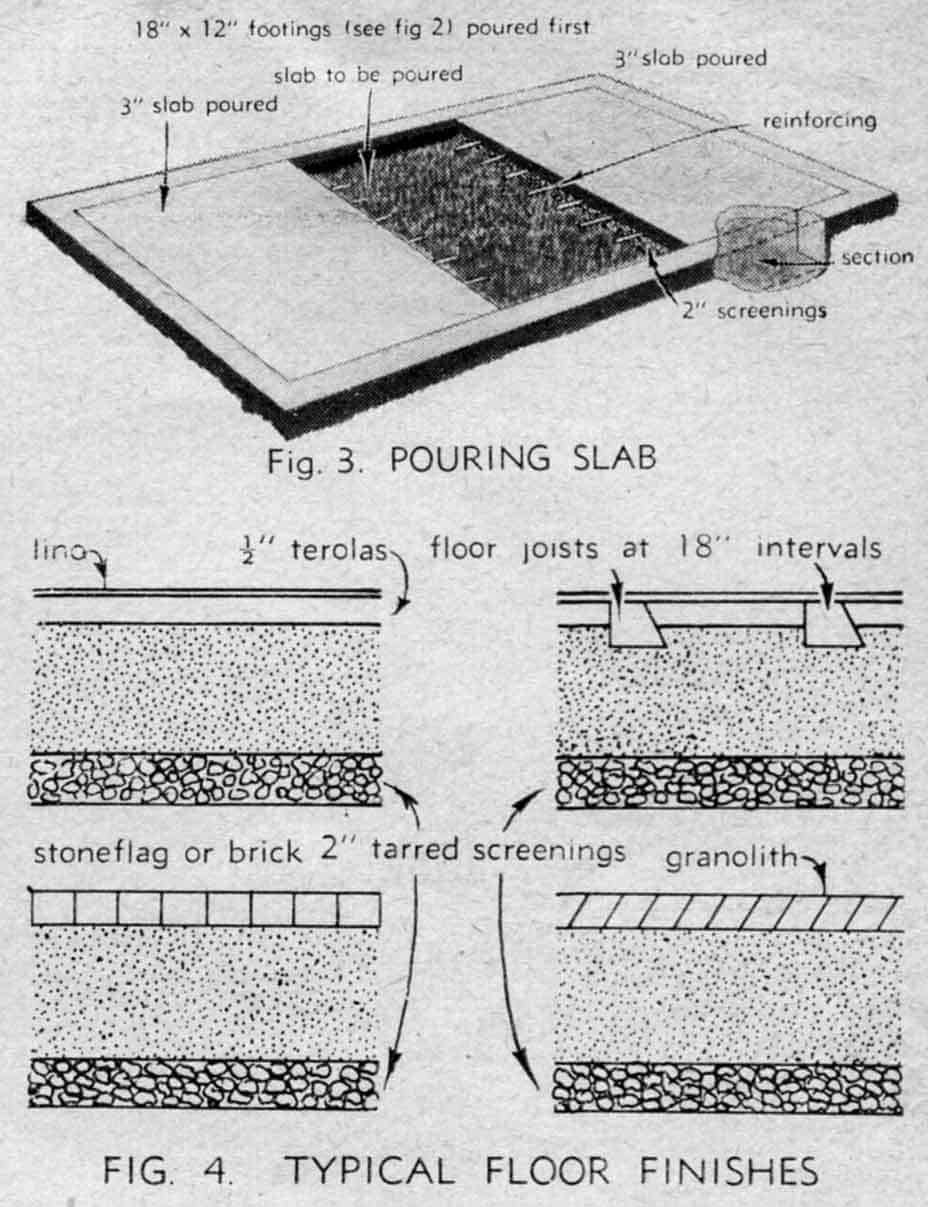
Occasionally this is, unobtainable except at considerable depth. It will be necessary in such cases to sink piers of concrete at regular intervals, and construct a pier and beam foundation. Such footings are expensive and the reinforcing must be properly designed. They should not be undertaken by amateurs without first consulting a structural engineer. In the vast generality of cases, however, the simple method shown in figure 2 is both adequate and economical. Reinforcing would consist of three inch mild steel rods laid about an inch from the bottom of the concrete, or B.R.C. fabric No.9 (a standard sized mesh for domestic work having ¼ inch inch rods set at 3 inch centres the width of the trench. When the footings have set and the form work stripped off, the slab itself may be poured. It should be done in sections each of which will be finished according to the flooring to be applied. If the dimensions of the building were 25ft. x 15ft. divide the work into three and lay both end sections first and the centre one last, see figure 3. In this way joints will be provided around each section of the slab to allow for expansion and contraction that always takes place in concrete work and which would otherwise fracture the slab.
Waterproofing the slab depends on the nature of the ground. In many cases on an excavated level it is not necessary to do more than make the concrete of good quality and add, an integral waterproof material such as Nonporite. If there is any doubt whatsoever lay two Inches of tarred blue-stone screenings (obtainable from most quarries) before laying the slab.
Concrete is not of itself completely impervious to water. No risk should be taken. Reinforcing should be laid with the slab.
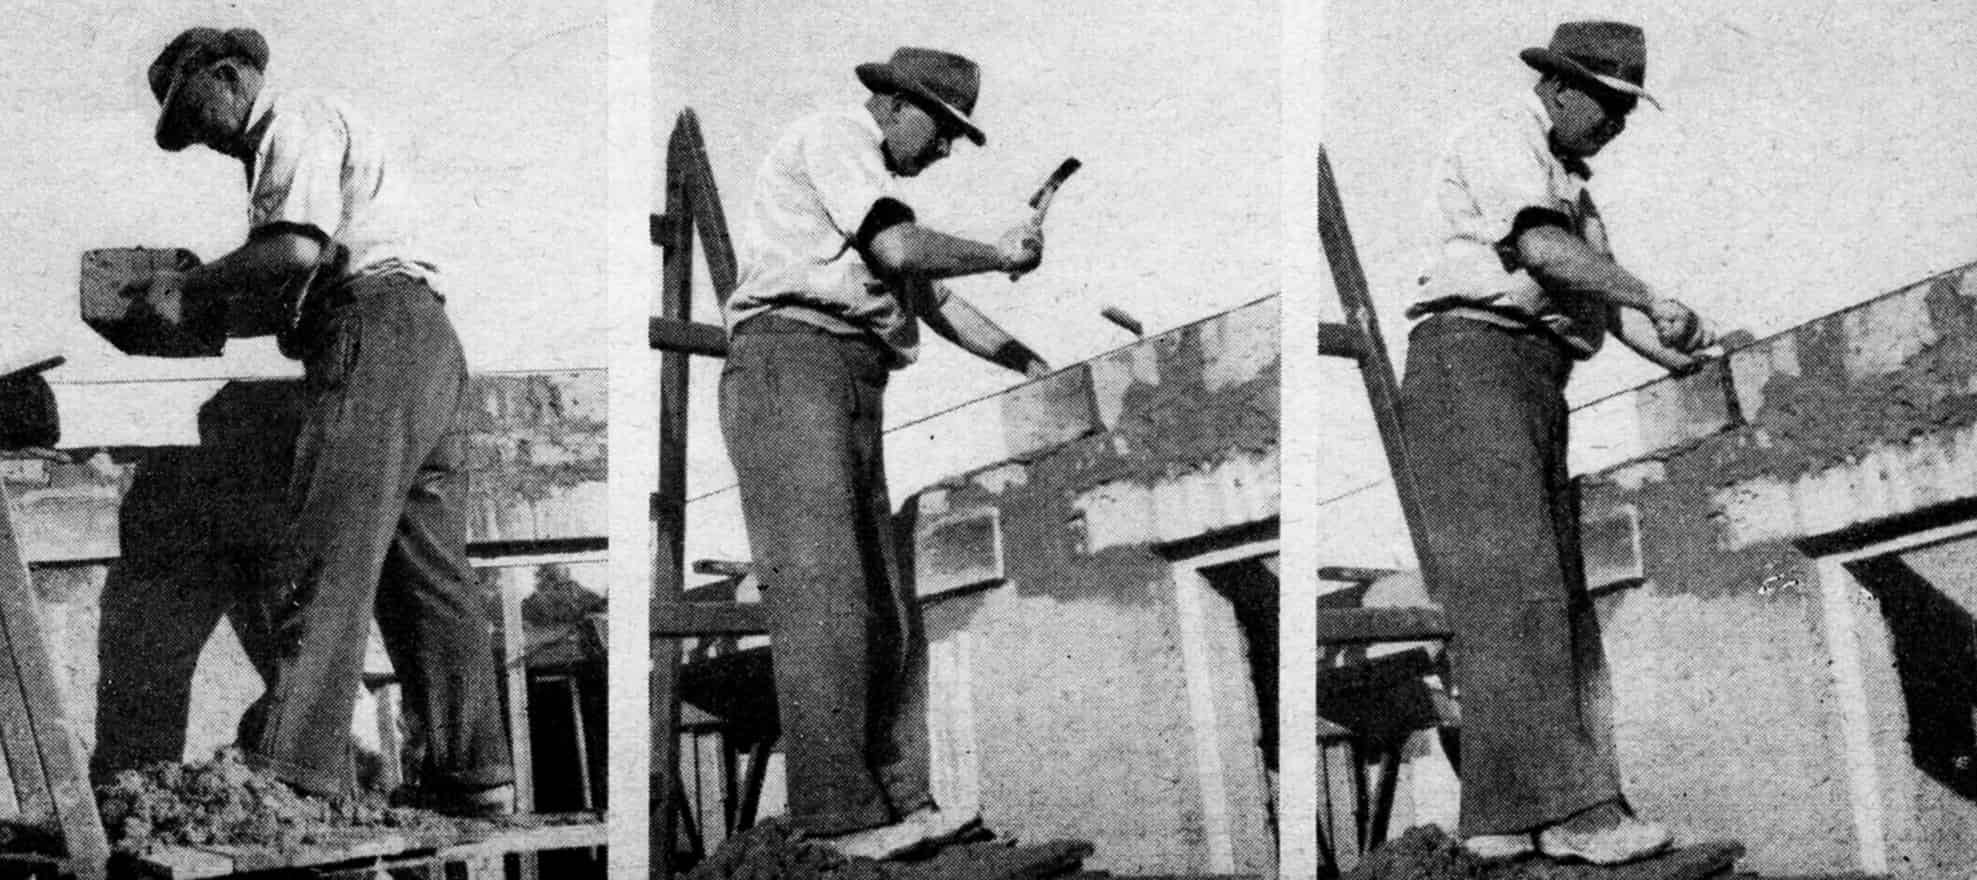 Worker is shown in three stages of the laying of a course in mud brick wall above window height
B.R.C. fabric No. 610 (10g. m.s. wire at 6in. centres both ways) would be sufficient. If it is decided to lay a timber floor over the slab, joists, preferably red gum or jarrah, should be bedded into the concrete on which to nail the floor boards. A few methods of floor finishing are shown in figure 4. When the foregoing is completed the site is ready for the actual mud construction.
Building the walls is one of the most interesting and exciting parts of the work. Results come quickly after the long arduous task of brickmaking, concreting and site levelling. In the studio walls the bricks were laid end to end so that the wall would be 9in. thick. This was sufficient for the light roof to be carried and for the nature of the building. For bigger jobs such as Buckney's, the external walls should be 12in. thick and the internal walls 9in. There is a great sense of security and friendliness in a thick wall.
In building the walls care must be taken to see that the bricks are properly bonded, that is that no joint in a course of brickwork is directly over a joint in the course below. Each brick shall be laid in a bed of mortar not less than half an inch thick and pressed firmly into it by rocking or tapping. The mortar itself is screened loamy earth mixed with water to a consistency of ordinary· bricklayer's cement or lime mortar. The corners are built up a couple of courses first and strings are stretched between them to guide the builder as he proceeds along the length of the wall. A spirit level should be used consistently. It is impossible to lay bricks straight by eye. Whereas the skill required to build a normal brick wall is considerable the size of adobe blocks make it much simpler. The slight irregularity in their shapes and position give when completed an appearance of lightly rendered stonework.
Reinforcement is laid between every fourth course of brickwork to give additional strength. Barbed wire or a strand of reinforcing fabric is suitable for this purpose. Where windows or door frames occur the reinforcing is tied in securely. If it is a strand of fabric, bore a hole in the frame and pass the wire through and bend the end over. In this, way the tendency for door and window frames to work loose in course of time is eliminated.
The window and door frames should be placed in position before the brickwork reaches them. They should be set vertically, then strongly braced with temporary timbers so that when the brickwork is brought up to them they will not move. Take the precaution of plumbing them, occasionally as the work proceeds.
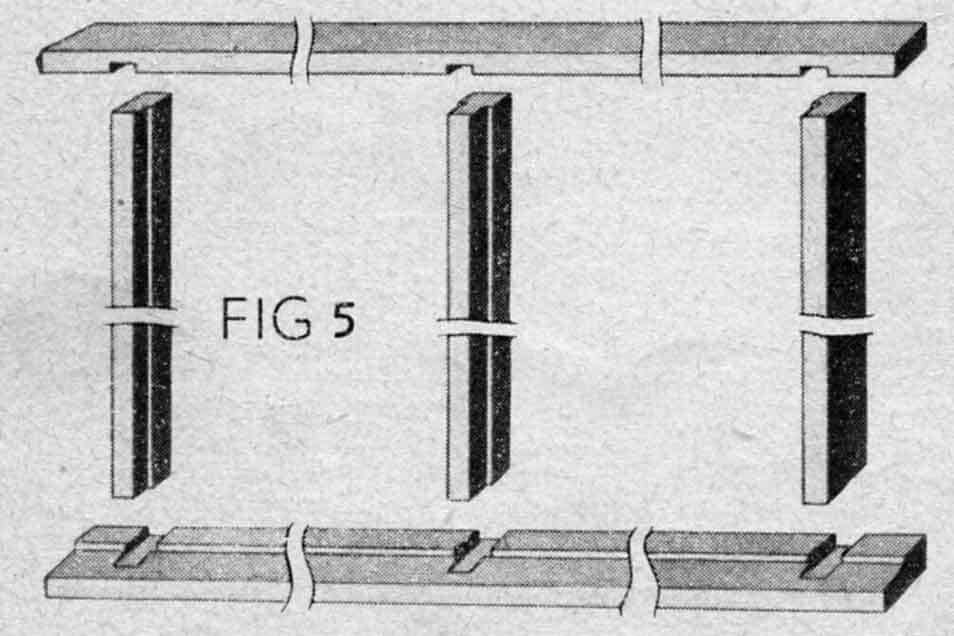
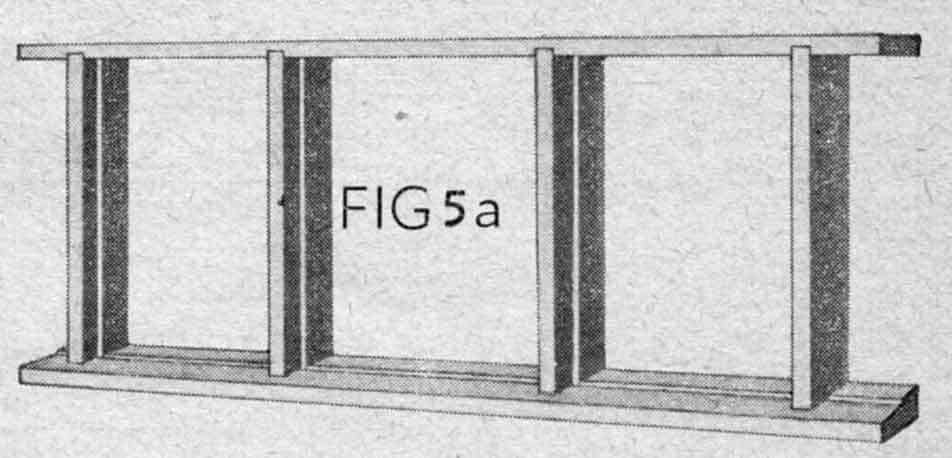
The frames themselves may either be timber or steel, but timber is recommended for the home builder, not only because of the appearance but also because he can build them himself. Doors or window sashes should be made at a joiner's shop but there is nothing difficult in having timber machined at the m1ll, cutting it to size, squaring and na1l1ng it together as shown in diagram 5.
The present writer employs casement window and doors extensively in his designs. They are suitable to mud buildings for three reasons: they make for simplicity, they are of good appearance, they make access with the outside easier. The complaint that they are draughty and difficult to screen is overcome if Whitco casement stay fasteners are employed.
 Casement windows, also door are recessed. Note footings
Lintels are necessary over window and door openings. They may be either of stout timber or concrete. Concrete is strongly recommended because it can be designed with the aid of reinforcing, to span any opening, is everlasting, forms an excellent bond with the walls, is simpler in character when rendered, and gives great strength to the mud. Diagram No.6 shows how it would be employed in the three roomed plan.
In the studio the eaves walls terminate at a height of eight feet. A timber wall plate out of 6in. x lin. hardwood was laid along the wall at this height, bedded in mud to bring it to an even level. Holes were bored through the plate and six inches into the brick with a half inch wood bit and coach bolts driven in to anchor the plate to the wall. Two simple trusses were constructed all shown in the photograph of the interior and placed a third and two-thirds distance along the walls. An interesting feature in themselves they also withstand any outward thrust that the intermediate rafters would place on the wall. The overall construction of the roof was that of an independent unit fitting over the walls like a snuggly fitting cap. In mud buildings it is always a good plan to think of the roof in this way.
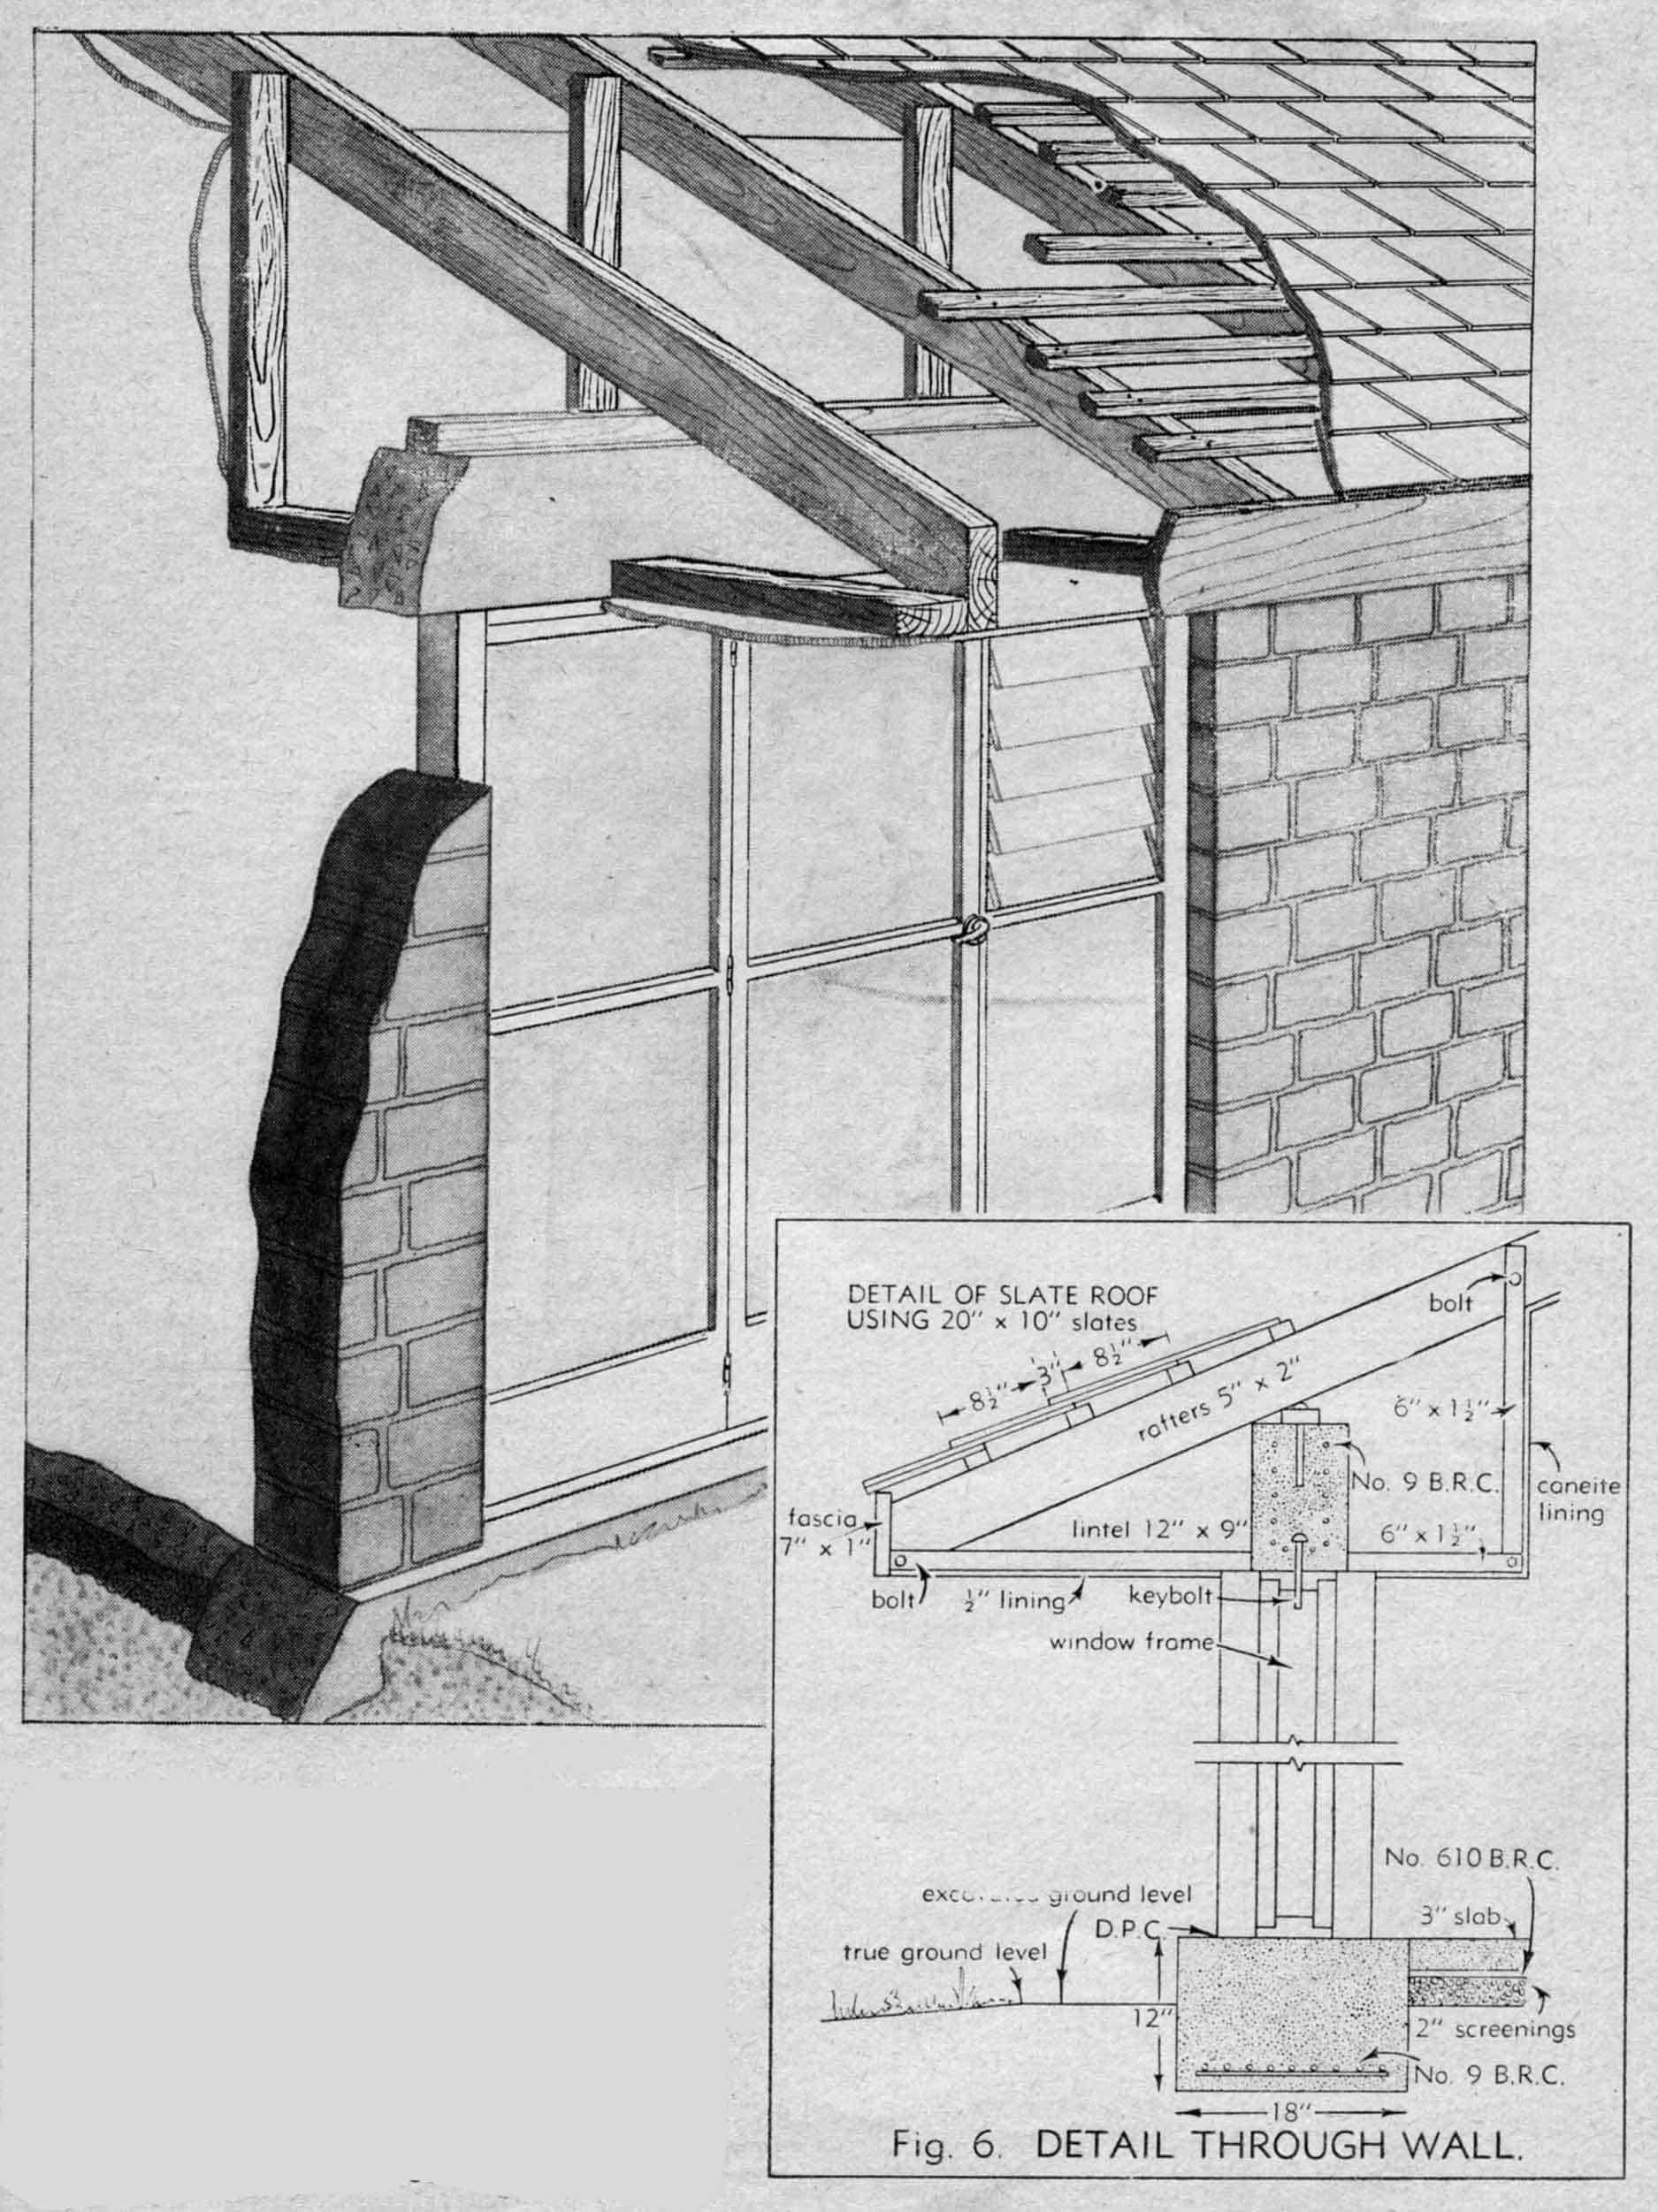
In the Buckney house, which was designed to carry a slate roof, the same pitched character of the ceiling was retained by another method. A concrete lintel has been designed to run the entire length of the eaves wall and tied by returning along the gables and walls to act, at the one time as a lintel over the door and window openings and as a rigid support against the outward thrust the rafters would exert on the walls. As has already been explained in the earlier section of this book, reinforcing is always built into concrete near the outer edge of any bending tendency, the strength of the concrete then becoming as great as the tensile strength of the reinforcement. Ties are built horizontally out from the concrete until they meet the rafter. They are slotted so that it can slip in and be bolted in position. Vertical pieces are bolted on to the inside of the lintel to both the ties and the rafter to form triangles of forces held in a constant position by the strength of the lintel. In addition they are bolted to each other and the struts and ties are lined in the finished work and give a suave appearance of good architectural quality. The gable ends above lintel height were of glass in this design which permits beautiful clerestory lighting. At a position one-third and two-thirds along the eaves walls bush timbers are to be laid over the lintel and tied to it by means of bolts that have been previously set into the concrete: The purpose of the beams is three fold. It again gives the roof an independent cap like structural quality, gives a sense of division between the different sections of the flexible plan and, they have a natural beauty of their own in keeping with the style of the house. Nor are they dear or unobtainable.
Suppliers of electric light poles w1ll provide them at between three and four shillings a running foot. Order them by the length and specify the butt and top diameters. In this case it was 9in. and 7in. The beams should be adzed either with an axe or an adze into a rough hewn square sectional shape. This is a job an amateur can do quite well after a very little practice.
Roof construction in a mud house is the same as in a traditional building. Slates and tiles are best laid by tradesmen but there is no great difficulty in putting on an iron roof provided the manufacturer's instructions concerning end and side laps are observed.
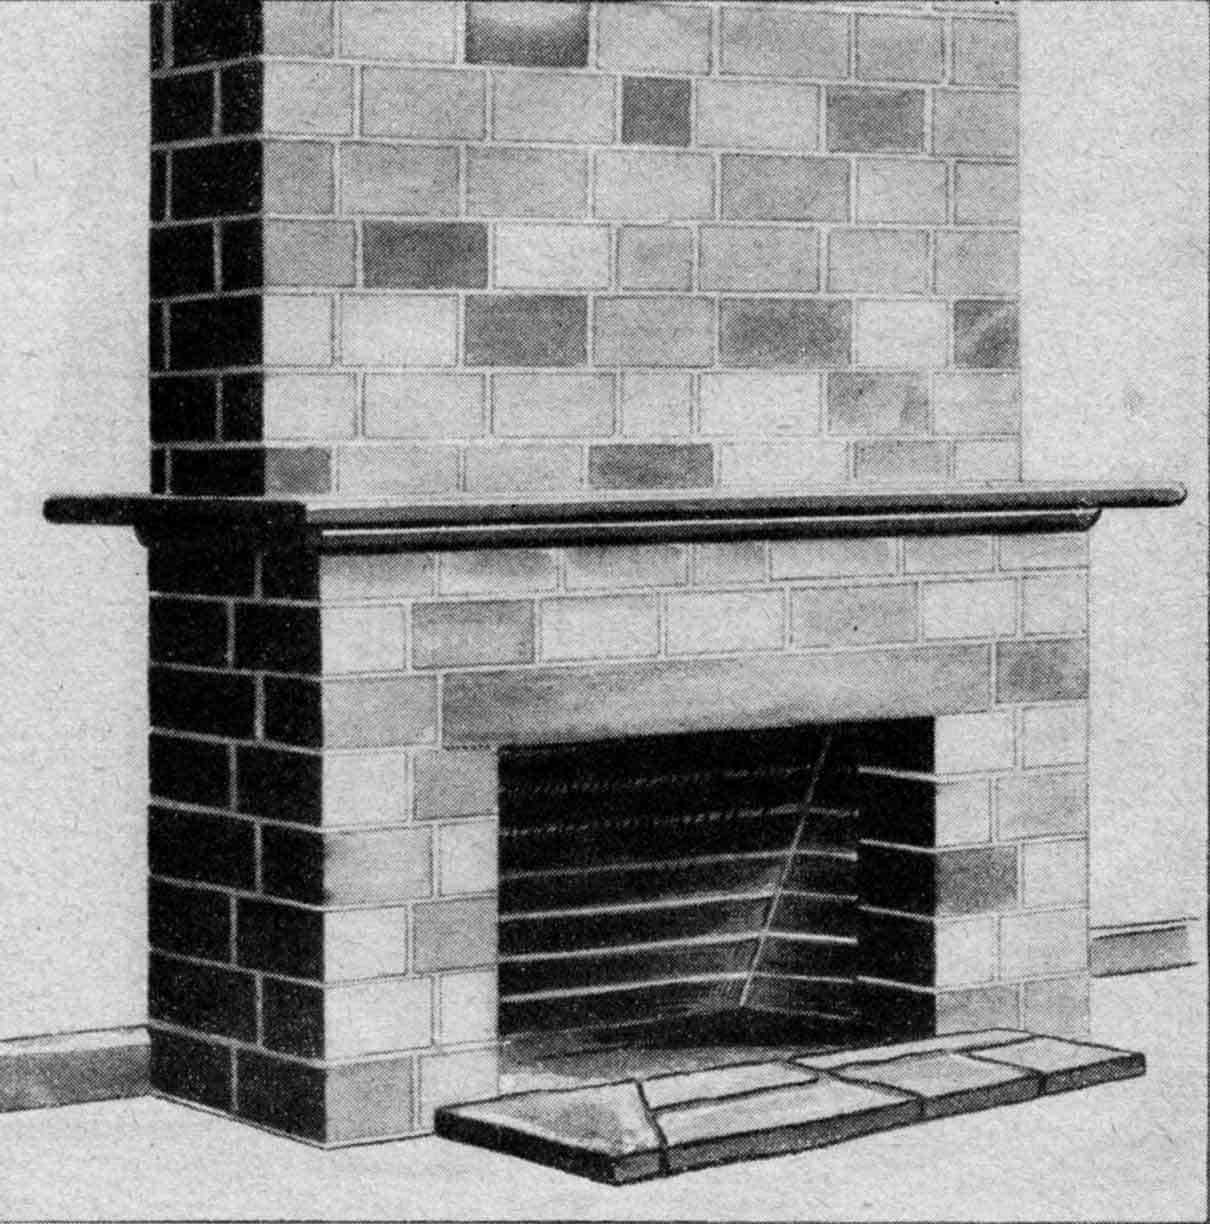
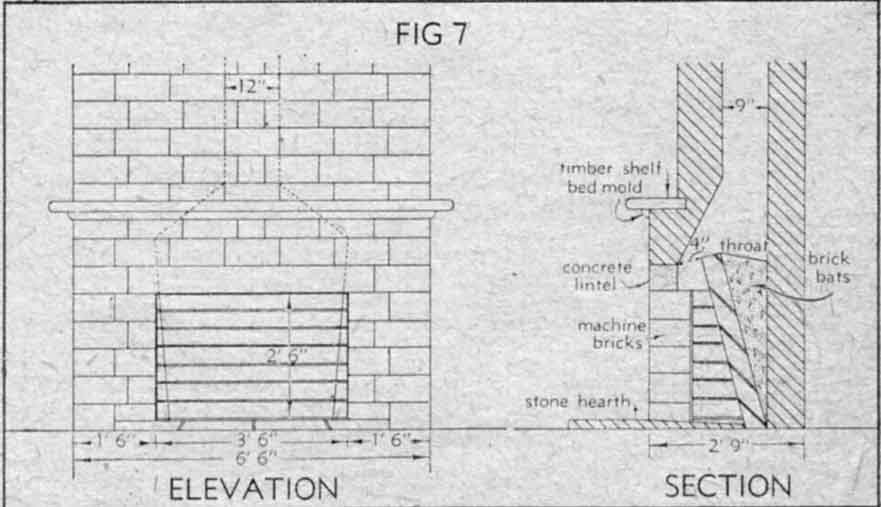
Chimneys and fire places may be built in mud in the same manner as with ordinary bricks. Although not essential it is good practice to line the hearth's bottom, side and back with fire bricks. A typical open fireplace chimney design showing the bond of the alternate brick courses is seen in Diagram 7.
Provide also a coping to any mud brick work exposed to the weather. The studio chimney which steps in ~bout half way up as well as the top are topped, with machine made bricks. The appearance and personality of a mud house is developed by such touches. The hearth was also formed with machine made bricks laid in a diagonal basket pattern.
When the, structure of the house is complete the finishing begins. It is here that the charm and homeliness of the material is most manifest. It is receptive to almost any treatment and invariably takes on something of the character of those doing the work. When you finish a mud brick house-there is no doubt that it is your house in a way that no other type of dwelling can be. Wives may join in the work and the results can give a subtlety beyond the understanding of a good tradesman. The mutual problem brings people together so that they give of their best.
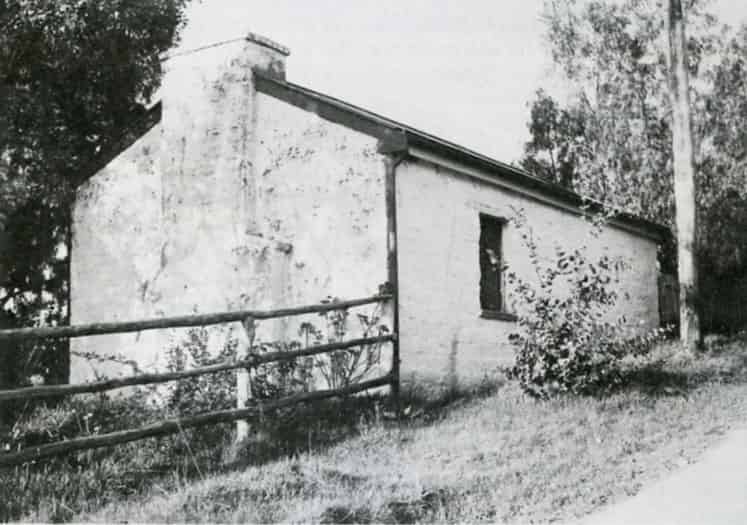
Professor Macmahon Ball's studio was supervised and built mostly by Miss Sonia Skipper, a girl who had had experience in this form of building. She finIshed the walls and ceilings and the accent of the building is hers. The walls were rendered inside and out with fine loamy soil, which had been mixed with cow dung. The mix was spread on thinly with a mason's trowel. On drying the smell goes and the rendering becomes tough and protective. The Walls were washed over outside with whitewash, the mix being about 20 parts of white cement 10 of lime, pigment and a handful of rock salt. A little experience in whitewashing may cause an alteration in this mix according to the texture of the wall. A stirrup pump may be successfully employed to spray it on large plain surfaces. It is a process which should be repeated every two or three years, but is so simple and cheap that it is a pleasure rather than a burden to do it, the results being so gratifying.
Another excellent method of finishing a wall externally that will give a good protection against the elements is to bag them down with a piece of jute bagging after they have been well wet down. The result is that the intercies and irregularities are filled up sufficiently to allow the oil to cover in an unbroken film. As much sharp, clean sand as will adhere should be rubbed in while the wall is wet. The oil dries very hard and is quite impervious to water for several years.
Inside there are many methods of rendering. Cowdung and mud is a good and easy one. Fine loamy soil put on with a plasterer's float gives a more normal finish but it is doubtful if it is as strong as cowdung. In _either case the walls should then be rendered with a good sealer after they have dried out and painted with kalsomines suitably tinted. It is generally better to use white kalsomine and bring it up to the desired colour by adding powdered pigments. In this way variations in tone may be worked in to give inflections and quality to the work.
The ceilings in the studio which were of timber laid over the exposed rafters were painted with a water paint to a warm brown red. The home builder will realise therefore that the treatment of his building out and in is capable of responding to the widest range of finishes and expression.
 The Macmahon Ball studio
Published in Concrete, Mud Stone and how to use them, A pratical guide to: cement work, stone work, and building in mudbrick and pise
©Mietta's 2024
|